Having caught up on my blog reading, I realized that we haven't posted in a month. Just wanted to give any readers of this blog a heads-up that we *probably* won't be launching in the near future. I haven't run any of the weather models myself (Daniel's been doing that, while I've been working on some basic air-density models and temperature measurement devices), but the winter winds in NC are likely to carry our balloon far out to sea.
On the temperature front, I ordered some iButtons to log the temperature and humidity of the balloon box, just because we can. I ordered the Thermochron (tempearture only) and Hygrochron (temperature and relative humidity) from iButtonlink. You can learn some neat stuff about the 1-Wire protocol here.
Tuesday, December 11, 2007
Friday, November 16, 2007
wind, wind, go away

Ok yeah it's supposed to be rain - but our launch date just got scrubbed due to wind :( Note the projected path has the balloon landing in the Atlantic. Hrm, it's a bit chilly to be swimming.
Thanks to project SABLE folks who pointed out that our GPS was one that would not work above 60000 feet (oops). We ordered a new Garmin GPS (see parts list) to replace the Byonics GPS. Here is the list we found for GPS receivers that work at >60k ft.
We had another 2 crammed work days: setup up new GPS; soldered the new power connection to a DB-9 connector (for connecting GPS to RF transmitter); bought and setup a 2nd RF scanner; setup a 2nd laptop for 2nd chase vehicle; setup a spreadsheet to do all our math calculations (helium needed, ascent rate, burst altitude); tied ropes to connect parachute to cooler; punched holes through the cooler for the camera lens, antenna, and the GPS receiver; setup styrofoam shipping wedges to hold the camera in place in the cooler; created S- hooks with 90 degree turns to attach the ropes to the threaded rods on the cooler; and we've run a lot of simulations on ballon track with our spreadsheat numbers to decide if we should launch this saturday or not (tomorrow). For now we've scrubbed the launch. I suddenly have a lot more sympathy for why NASA is always moving the shuttle launches.
We've also decided that in hindsight, the parachute is too large. We don't need it to land like a feather - we just need the cooler and camera to survive. Our current payload estimate is 3lbs and our chute was rated for 3.5-8lbs (R7). We'll try to exchange the chute for a smaller one - maybe something in the 1.5-2.5lb (R3 or R4) range. Thanks to the folks at Rocketman for their advice here.
Monday, November 5, 2007
Software Recap
We are using several different bits and pieces of software for this project. We can split these apps up into a few different categories:
Pre Flight
Payload
Our payload is pretty simple, we don't have an onboard computer so the only software application we are using is for our camera. CHDK is open-source 3rd party software that runs on several different digital cameras. We need to use CHDK to program our Canon A610 to take pictures on some set interval for an extended period of time. The default canon firmware has some time-lapse photography ability but it is limited to 100 pictures. We would like to take as many pictures as we can on a fully charged set of batteries thus the 3rd party software.
Chase Vehicle
Pre Flight
- Ascent Rate & Burst Altitude calculator - This is a handy spreadsheet for calculating the ascent rate and burst altitude for your balloon. These numbers are needed in order for the tool below to calculate the balloon's flight path.
- Balloon Track for Windows is a software package that will project the flight path for your balloon. You tell the tool where you want to launch from, the ascent rate, the burst altitude, the descent rate and the wind data for your launch date and it models when and where your balloon should land. This is designed to give you a rough idea of where your balloon will go so you can avoid things such as your local airport and large bodies of water...such as the Atlantic Ocean :) If you have Microsoft MapPoint installed you can generate an image of the projected flight path. The green line shows the flight of the balloon during ascent and the red line is for descent. This shows us landing close to the ocean so we'll have to head west for our launch.


Payload
Our payload is pretty simple, we don't have an onboard computer so the only software application we are using is for our camera. CHDK is open-source 3rd party software that runs on several different digital cameras. We need to use CHDK to program our Canon A610 to take pictures on some set interval for an extended period of time. The default canon firmware has some time-lapse photography ability but it is limited to 100 pictures. We would like to take as many pictures as we can on a fully charged set of batteries thus the 3rd party software.
Chase Vehicle
- AGW Packet Engine - This is the software that listens to "line in" on your PC for the audio coming from your receiver. It translates the audio into a digital packet format that can be used by other windows applications.
- AGW Tracker then listens to the packets from AGW Packet Engine. These packets contain the GPS coordinates of our balloon which allows AGW Tracker to plot the location of the balloon on a map. If you have Internet connectivity you can just use google maps but if not you will need Microsoft MapPoint. We won't have Internet connectivity in our chase vehicle so we'll be using MapPoint.
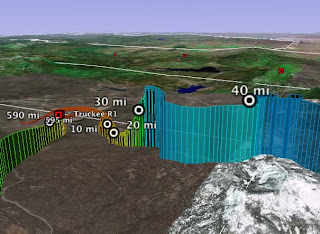
- Google Earth - Free software (mostly) that will let you do some very cool stuff in terms of displaying the path of some object based on GPS data.
- GPS Visualizer - If you give GPS Visualizer a text file with the GPS coordinates of your balloon over time it can generate several different plots of the flight path. The best results are via a Google Maps image and a Google Earth file. Here is an example of a hang glider flight path in Google Earth:
- PixGPS - I haven't used this yet but PixGPS will let you tag your pictures with GPS coordinates in the EXIF data. This way you know exactly where the picture was taken which makes it possible for tools like Google Earth to display the pictures on a map based on where they were snapped.

Tuesday, October 16, 2007
What's Your Vector, Victor? Part Deux
The wonders of modern GPS systems are a huge part of this project. We're using Google and Microsoft Mappoint for our tracking software. (No, we didn't spend huge $$$ to get Mappoint. I got it free with my work volunteering for the National Girls' Collaborative Project, a pretty worthy cause that you should check out.) Google rocks, but we needed some sort of software that we could access without a connection to the Internet for map updates (like Google Maps needs).

Daniel took it out and drove around in his car the other day to see how the software works, and he was able to draw out a track (not shown here). Tonight, while we were waiting for Alli and Dale to come back from the store, Daniel came out front with the laptop and I rode off on my bike. (Kids, don't try this at home! Especially not after dark, in dark clothes, without a headlight. I should have been wearing sunglasses, too.)
Unfortunately, the antenna on the receiver wasn't powerful enough. We switched out the antenna (more power!) and then Alli and I went for a walk around the neighborhood.
Success! Here's a copy of the track we walked after it was imported to Google Earth. (It was actually dark out when we went walking.) We didn't actually walk *through* those houses, but it's pretty good for a homemade tracker system.

Daniel took it out and drove around in his car the other day to see how the software works, and he was able to draw out a track (not shown here). Tonight, while we were waiting for Alli and Dale to come back from the store, Daniel came out front with the laptop and I rode off on my bike. (Kids, don't try this at home! Especially not after dark, in dark clothes, without a headlight. I should have been wearing sunglasses, too.)
Unfortunately, the antenna on the receiver wasn't powerful enough. We switched out the antenna (more power!) and then Alli and I went for a walk around the neighborhood.
Success! Here's a copy of the track we walked after it was imported to Google Earth. (It was actually dark out when we went walking.) We didn't actually walk *through* those
 houses, but it's pretty good for a homemade tracker system.
Perish the Thought!

And now, for something totally different... the chemical engineer is posting (instead of the three network engineers).
A lot has happened since the last post. Now we're working some on the mechanical engineering parts of the project: putting together the payload and connecting it to the balloon. A week ago Sunday, we made a trip to Lowe's to buy some of the nuts and bolts (literally) of the project. (When we figure out exactly what pieces end up as a part of the final project, we'll list them here.) We met at Dale's to work on building the payload.
We got a medical-grade styrofoam cooler, which came in a box like this one that Erin is modeling for us.
Dale and Alli drilled some holes into the cooler to push through two threaded metal rods, which were cut from a single 3-foot span. Unfortunately, the threads got crushed from being held in a vise to be cut, so we ended up breaking the rods and stopped for the day.
Monday, October 1, 2007
Transmit and Receive now working
We met at Dale's house last week to assemble and program our RF transmitter (the Micro-Trak 300). We programed the transmitter with our callsign and told it how often to transmit the GPS coordinates coming from the GPS Receiver. Programming the transmitter was done through a windows application from byonics.

We had to do a little bit of soldering...lucky for us Erin was there to give us a hand :) I suppose at this point she is destined to be an engineer.

Here you can see how the power source, antenna, GPS receiver, and the RF transmitter all connect. We are able to receive the signal with our scanner, feed the audio output from the scanner into our laptop and have the laptop plot the location of the device on a map!

Friday, September 28, 2007
Doctor, doctor.....doctor, doctor
Welcome to Project-WARPED Michelle, Ryan, Mark, Aaron, and James!! We now have enough members with a PhD that all WARPED meetings will begin as shown above :)
Another cool balloon project
I stumbled across the blog for GeoCam the other day. These guys are working on a project to photograph a large geographic area following a natural disaster (think New Orleans the day after Hurricane Katrina). The logic is that it can take several days to reposition a satellite to photograph the disaster zone so why not use a high altitude balloon with a digital camera to do the job ASAP.
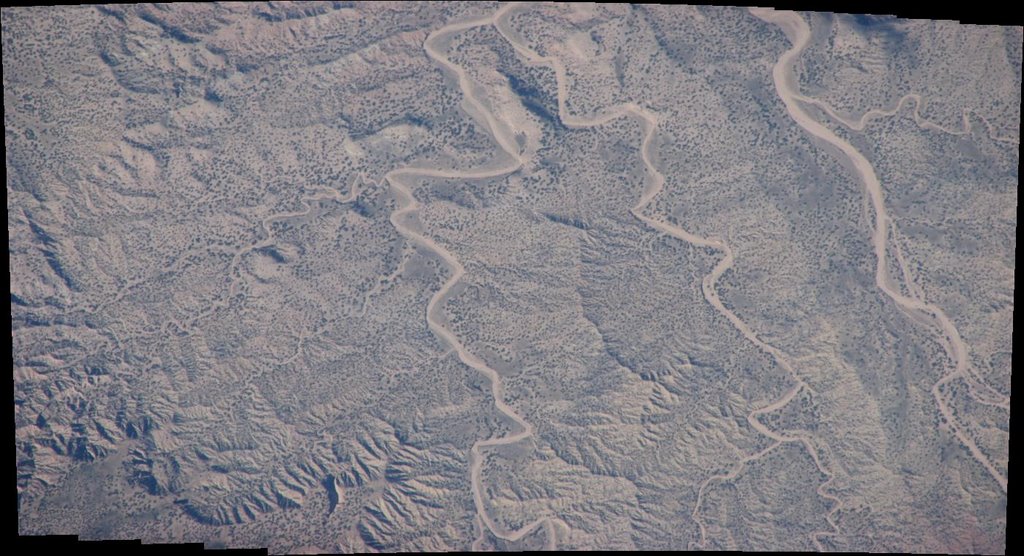
They have developed a mechanical device to twist and tilt the camera so they can photograph a wider area than if they only snapped photos with the camera pointed straight down. The pictures are then stitched together to form one larger picture like so:

It seems like a good idea. Hopefully they are able to get the kinks worked out before the next big hurricane hits.
They have developed a mechanical device to twist and tilt the camera so they can photograph a wider area than if they only snapped photos with the camera pointed straight down. The pictures are then stitched together to form one larger picture like so:
It seems like a good idea. Hopefully they are able to get the kinks worked out before the next big hurricane hits.
Monday, September 24, 2007
Overall gameplan
One of our motivations for blogging this project is that we haven't been able to find any good "from start to finish" documentation on how to launch a camera with a weather balloon and recover it. We found several other balloon blogs but none of them gave much detail on how they did everything. We're going to try to document as much as we can so that hopefully someone can use this blog as a reference for their own balloon project. That said, here is a rough overview of how we think this will work. We're learning as we go though so I'm sure this will change.
- Ascent - This is the easy part (we think). We buy a weather balloon,
 put our camera and other electronics gear in some sort of styrofoam box, attach the box to a parachute and attach the parachute to the weather balloon. Then we fill our balloon with enough Helium to lift the payload (camera, styrofoam box, parachute, etc) plus 1 lb to 1.5 lbs of extra lift. Dale found a chart that shows what the ascent rate should be based on how much extra lift you have. I'll get that from him and will link it here. I found one balloon site where the group was using Hydrogen to provide lift. Didn't the Germans give that a try a few years ago? :) I like having eyebrows so I think we'll stick to Helium.
 - Descent - At some point the weather balloon will burst due to the expansion of the Helium. Of the other balloon project websites that we've read the highest launch was to 117k feet. That's pretty darn high if you stop and think about it! I know I'll be very happy if we get anywhere close to that. Anyway, once the balloon pops you need a parachute to get your payload back on the ground in one piece. Parachutes from model rockets seem to be the popular choice. We haven't ordered one yet because we don't know how much our payload is going to weigh.
- Camera - Obviously we want something digital and we need a way for the camera to take pictures without any user intervention. The easiest thing to do is buy a camera that has an intervalometer feature which allows you to set the camera to take a picture every X seconds. The other option is to rig some sort of mechanical device to push the shutter button every X seconds. Dale has tracked down a free camera for Project-WARPED but it doesn't support invervalometer so we will have to rig a mechanical solution. Here's a great website for some more information on time lapse photography.
- Tracking - This is the tricky part. If you launch a balloon to 100k feet and take lots of cool pictures you need a way to recover the camera when the balloon finally lands. We will be using Automatic Position Reporting System (APRS) to track the balloon's location. In a nutshell, APRS is implemented by using a GPS receiver that attaches to a RF transmitter which in turn transmits the GPS coordinates via packet radio (this is why we needed our ham radio licenses). We will pick up the RF signal from our transmitter (the Micro-Trak 300) by using a RF scanner on the ground. The headphone output from the RF scanner feeds into a laptop's microphone input which decodes the data from the scanner into a digital format containing the GPS coordinates of the balloon. Doing this last part on the laptop is something we don't have working yet. The following powerpoint presentations have more detail on APRS and how it ties into ballooning:

What's our vector Victor?


The FCC was faster than we expected :) We were added to their online database on Friday, September 21st (6 days after passing the test). Alli's callsign is KI4ZNJ, Dale's is KI4ZNK, and Daniel's is KI4ZNL.
Getting our technician license wasn't too bad. We studied for the test using HamTestOnline and found a testing location in our area via the AARL website (American Radio Relay League). The test is 35 multiple choice questions and you have to get 26 correct to pass. If you decide to take the test be sure to bring $14 cash, a photo ID, a No 2 pencil and a calculator.
Monday, September 17, 2007
3 for 3 on ham radio licenses
 All three of us passed our ham radio license test on Saturday morning!! I was sitting next to Alli when I heard the test administrator whisper to her "congrats, you only missed two" so I just guessed "C" for all remaining questions on my test. We only needed one of us to pass anyway and I really had to pee so I figured why not :)
We have to wait for our names to show up in the FCC database before we are officially licensed. That's supposed to take about two weeks so it isn't the most efficient process in the world. Once that happens we'll be able to begin testing our GPS and the little radio that transmits the GPS coordinates over radio. In the meantime we're going to start working on some sort of payload box to hold the camera, radio, etc. That's all for now...
Tuesday, September 11, 2007
Green eggs and ham...

OK so in order to track our payload when we send up the balloon it must transmit on amateur radio frequencies, so we have to get ham radio licenses in order to even turn on the transmitter and check it out. So this saturday the three amigos go to take our exams. Good thing we all have some electronics background, we already learned a lot of this. And who needs books these days, you can find everything you need online! (More ham links).
Green eggs - well supperclub was yesterday and the theme for dinner was breakfast foods, ok so we didn't have green eggs, but it would have been fun :) Dang now I'm hungry for french toast again.
Friday, September 7, 2007
Why "Deathstar"?

What does the Galactic Empire's Deathstar have to do with tying a digital camera to a balloon and floating it to 100,000 feet to take some cool pictures? Well to be honest with you....absolutely nothing. Alli came up with "Wolfpack Amateur Radio Photo Experiment" but WARPE doesn't sound nearly as cool as WARPED so we started brainstorming for a word that begins with D that we could somehow relate to cameras or balloons or amateur radio or space. Alli came up with Deathstar (can you detect a theme here with Dale and Daniel's lack of creativity?) and so "Wolfpack Amateur Radio Photo Experimental Deathstar" it is. BTW did you know that Warpe "is a municipality in the district of Nienburg, in Lower Saxony, Germany"? At least that is Wikipedia's take on Warpe.
I feel like I should mention that this is my very first post in a blog ever!! I read blogs on Trail Journals and I frequently check out Dave Samuels' blog but I never got around to participating in a blog until now. Don't you feel special knowing you've read my first blog entry?
I feel like I should mention that this is my very first post in a blog ever!! I read blogs on Trail Journals and I frequently check out Dave Samuels' blog but I never got around to participating in a blog until now. Don't you feel special knowing you've read my first blog entry?
Thursday, September 6, 2007
planning the deathstar
Ok so we picked a name, that's a good start!
Wolfpack Amateur Radio Photo Experimental Deathstar - WARPED - nice ring eh?
Other ideas were WARBLE and HERPES (don't ask...)
Stage 1 - So the idea is to get a small (lightweight) camera as high as we feasibly can and get some cool pictures with the curvature of the earth, maybe some cool cloud cover, etc.... We think we'll probably have to drive west to release the balloon to make sure that it doesn't end up in the Atlantic ocean. The guys are currently ordering parts from wherever they can be found the most cheaply (eBay, Nascar websites, radio shack, etc...)
 We got our hair brained ideas mostly from a group called SABLE who got some pretty darn cool photos of the earth (see photo at left, click to see full sized image), and our ideas have exploded from there.
Stage 2 thoughts - 2 way communication with the payload
Stage 3 thoughts - wireless downloads? Maybe a powered webcam?
Wednesday, September 5, 2007
Balloon Blog!
This blog is going to be where we (Daniel, Dale and I (Alli)) are going to keep a running blog of our adventures in High Altitude Ballooning and Photography. Oh yeah and throw in Amateur Radio operation in for good measure… We are compiling a list of things we need and things we have purchases as well as a bunch of good links to other ballooning sites.
Check back often for more updates.
Subscribe to:
Posts (Atom)

